
Welcome to the world of wall art, where creativity meets transformation and every room becomes a canvas for expression. Whether you’re just beginning your interior design journey or you’ve been experimenting with decor for years, “10 Creative Wall Art Ideas For Every Room” is here to inspire and guide you. These thoughtfully curated ideas are designed to spark your imagination and provide practical solutions, ensuring that your walls tell a story as unique as you are.
Imagine walking into a room where the walls not only complement but elevate the entire space, speaking volumes about your personality and style. By exploring these diverse wall art ideas, you’ll discover the joy of turning blank walls into stunning focal points, adding depth and character to each room. With each tip, you’ll gain the confidence to experiment with different textures, colors, and arrangements, transforming your home into a masterpiece that reflects your creative spirit.
Embrace the satisfaction of seeing your vision come to life as you implement these versatile techniques tailored for every room. As you dive into this guide, you’ll find the perfect balance between inspiration and functionality, empowering you to create spaces that are both beautiful and meaningful. Get ready to unleash your inner artist and embark on a rewarding journey of design discovery, one wall at a time.
Mix and Match Art Styles
Mixing and matching art styles can create a visually dynamic and personalized space. Start by selecting a dominant style that reflects the room’s overall theme, such as contemporary or vintage, and then introduce contrasting elements like abstract or classical pieces to add interest.
Consider the color palette of your chosen artworks to ensure they complement each other and the room’s decor. For a cohesive look, select pieces with a unifying color scheme—such as various shades of blue or warm earth tones—and distribute them evenly across your wall space.
Beginner decorators can start with a simple gallery wall by combining art of different sizes and frames but maintaining a consistent spacing between each piece. Use a mix of frames in different finishes like wood, metal, and acrylic to add texture and depth to your display, making it both intriguing and personalized.
For a more advanced approach, play with the scale and placement of art pieces to create a sense of rhythm and balance. Position larger pieces as focal points and surround them with smaller artworks to guide the eye naturally across the room, creating a curated and layered effect that draws interest from every angle.
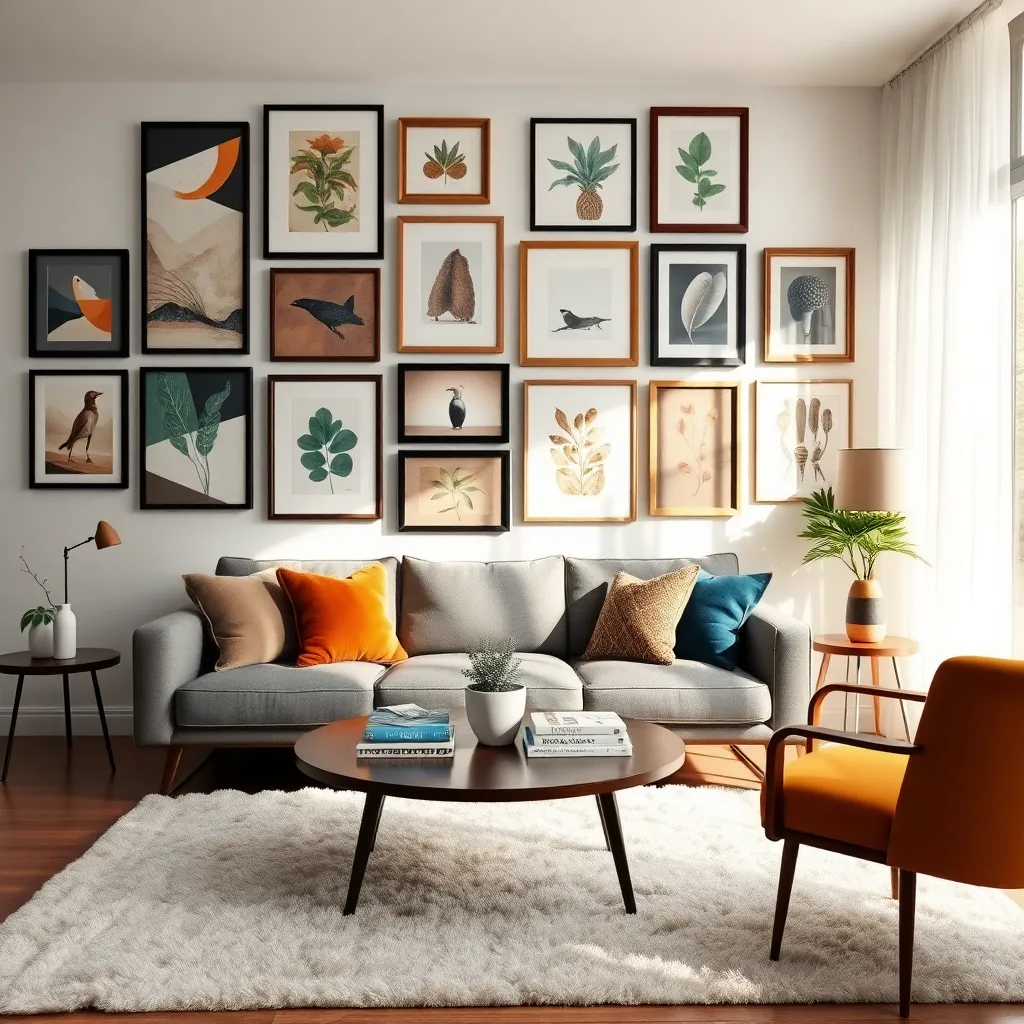
Create a Gallery Wall
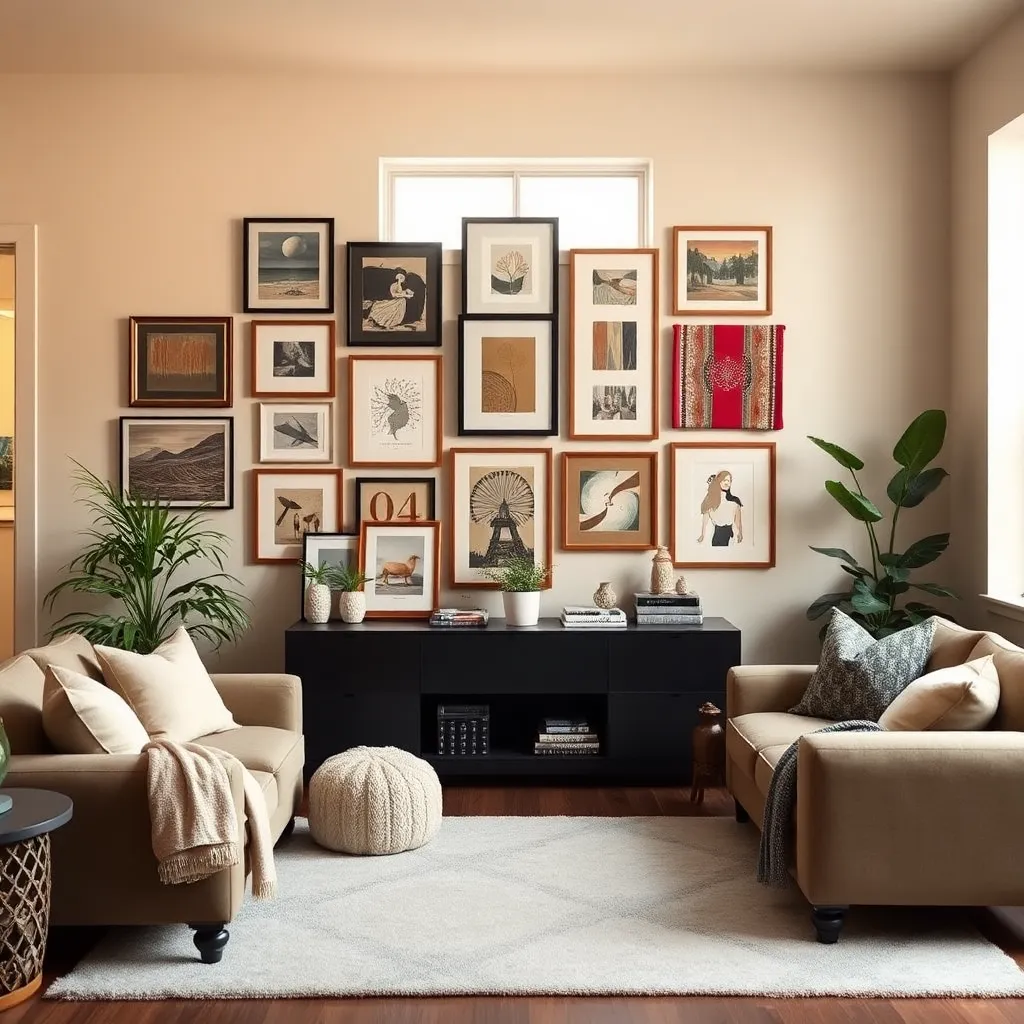
Creating a gallery wall is an excellent way to infuse personality into any room. Start by selecting a mix of artwork that reflects your style, including photographs, paintings, and prints. Consider using frames of different sizes and finishes to add depth and interest. For a cohesive look, choose a unifying color palette or theme that ties all the pieces together.
Begin by laying out your artwork on the floor to experiment with different arrangements. Aim for a balanced composition that feels harmonious rather than cluttered. You can use painter’s tape to outline the arrangement on the wall before committing to nail holes. This technique helps you visualize the final look and make any necessary adjustments.
For those seeking a more advanced approach, try incorporating three-dimensional objects like small sculptures or decorative plates. These elements add texture and dimension, making your gallery wall truly dynamic. If your collection includes various styles, such as abstract art alongside classic landscapes, use consistent frame colors to maintain unity.
When it comes to placement, consider the room’s function and the height of the viewer. In living rooms, position the gallery wall above a sofa or console table, keeping the center of the arrangement at eye level. In a hallway or stairwell, follow the rise of the stairs to guide the placement. This attention to detail ensures your gallery wall enhances the overall aesthetic of the space.
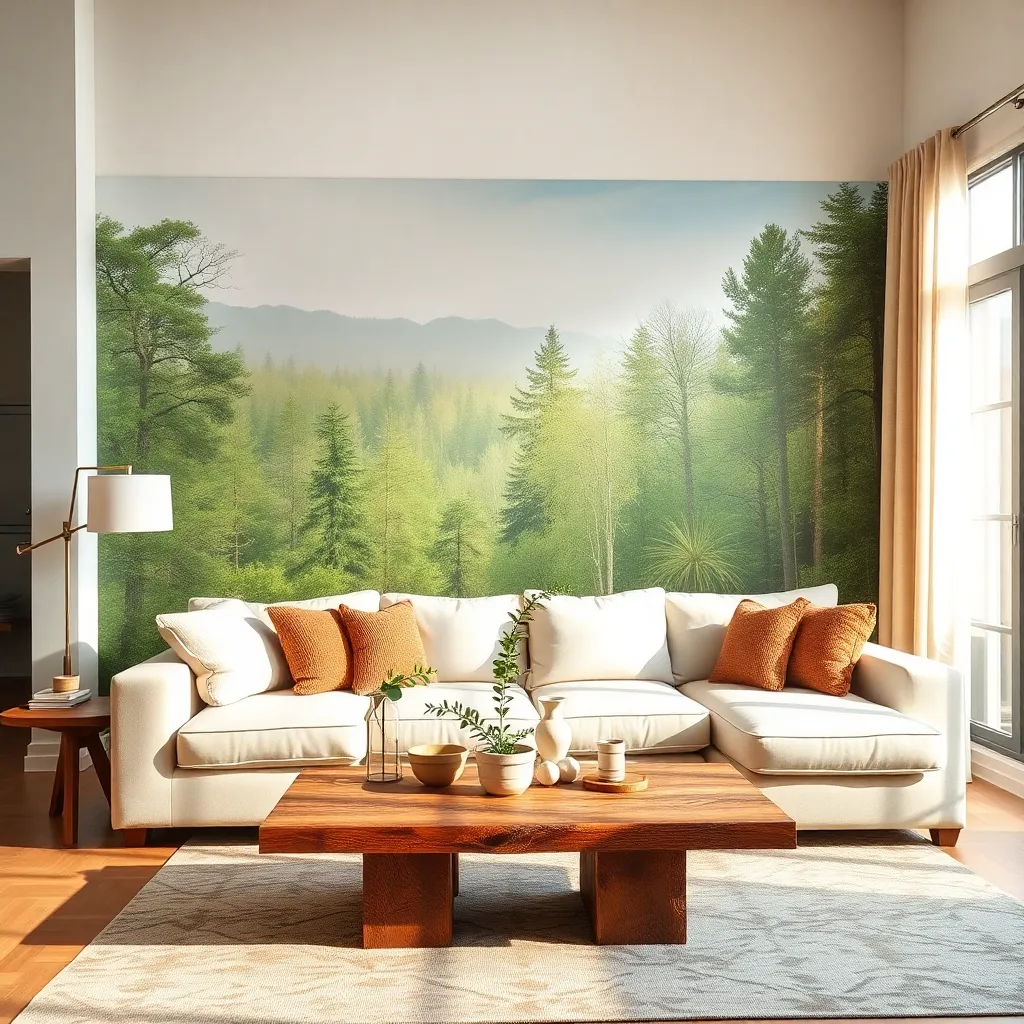
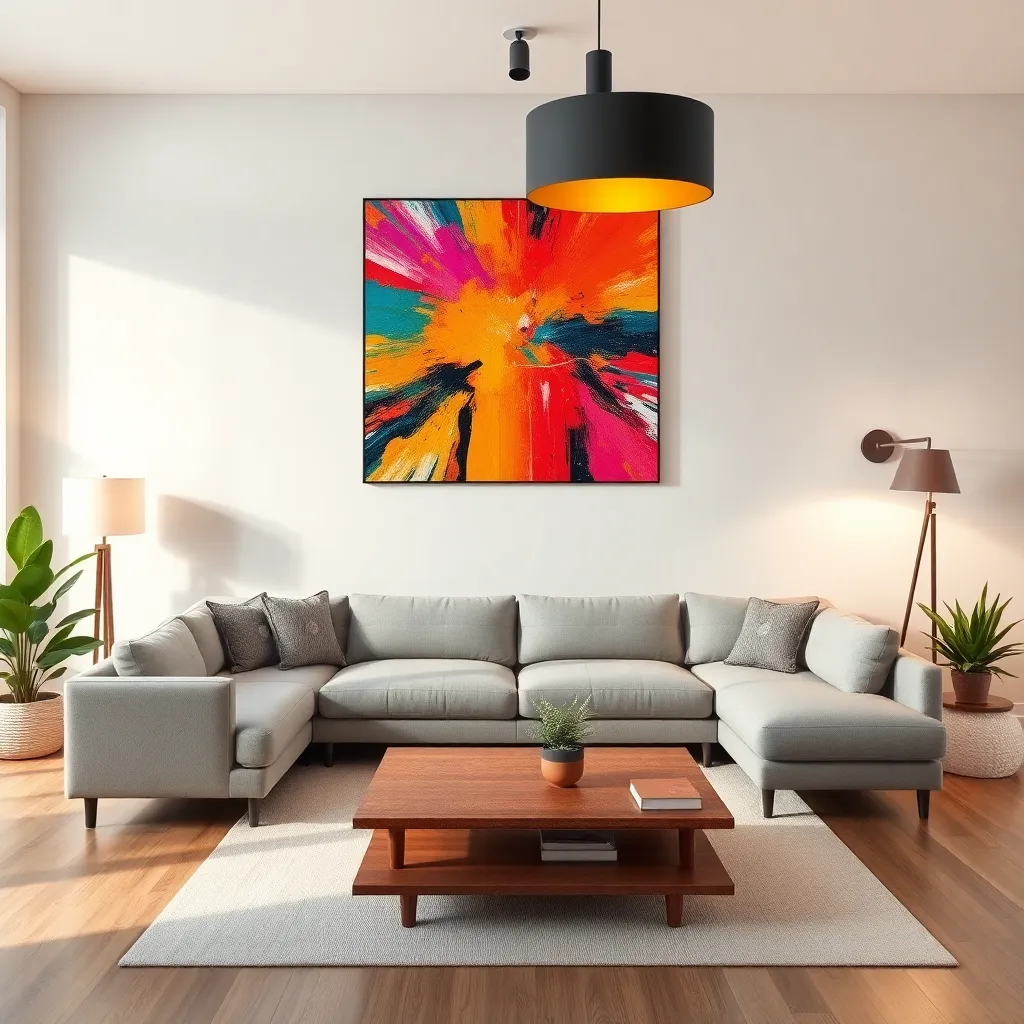
Use Oversized Statement Pieces

Choosing an oversized statement piece can instantly transform a room by serving as a dramatic focal point. Consider a large-scale artwork or an intricately designed tapestry to fill a blank wall, creating a sense of grandeur and sophistication.
When selecting an oversized piece, ensure it complements the existing color scheme to maintain a cohesive look. For example, a bold, colorful painting can invigorate a neutral room, while a monochromatic piece might enhance a more vibrant space.
Placement is key when working with large items; hang them at eye level to draw attention and create a balanced visual impact. In living rooms or bedrooms, a big statement piece can be perfectly positioned above a sofa or bed, anchoring the space elegantly.
For those seeking to experiment, consider mixing materials by opting for a piece with texture, like a 3D metal art installation. This adds depth and interest, making your wall art not just a decoration but a conversation starter.
Incorporate Wall-Mounted Shelves
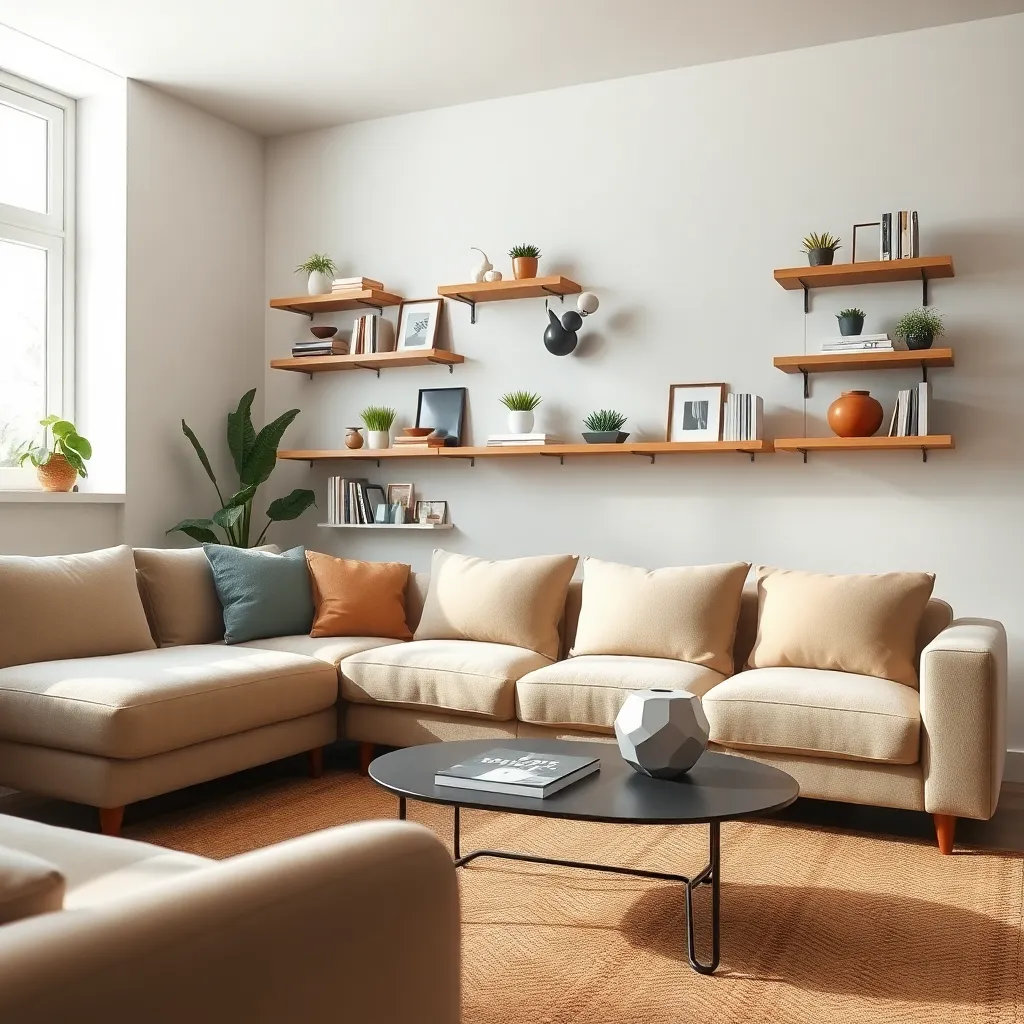
Wall-mounted shelves offer a brilliant solution for combining function with aesthetics, allowing you to display cherished items while maximizing space. They can serve as a canvas for your creativity, where you can showcase art, books, or decorative objects. For a cohesive look, consider shelves that match or complement the room’s color scheme. Neutral tones like white or light wood work well in minimalist or Scandinavian interiors, while darker hues can add depth to more traditional settings.
When selecting materials, think about the overall style and durability you desire. Wooden shelves provide warmth and a timeless appeal, whereas metal or glass options can lend a more contemporary edge. Placement is key; install shelves at eye level or stagger them for an artistic look. This not only enhances visual interest but also ensures accessibility and usability.
For beginners, start with a simple arrangement using a few shelves to avoid overwhelming the space. Focus on balancing the visual weight by alternating between books and smaller decorative items, like vases or framed photos. Advanced decorators might experiment with asymmetrical layouts or layering different textures, such as pairing wooden shelves with metal brackets for an industrial chic vibe.
Consider the function of the room to determine how best to use your wall-mounted shelves. In a living room, they can hold curated collections or family memorabilia, creating a personalized gallery. Meanwhile, in a kitchen, they serve a practical purpose by holding spices or cookbooks, making everyday items part of the decor. By thoughtfully incorporating wall-mounted shelves, you add both utility and character to your space.
Display Rotating Art Collections
Displaying a rotating art collection is a dynamic way to keep your home feeling fresh and inspiring. Start by selecting a few key pieces that resonate with you and plan a schedule to rotate them every few months. This approach not only keeps the space lively but also allows you to experiment with different styles and moods. For beginners, a simple gallery wall with interchangeable frames can be a great starting point, offering flexibility in arrangement.
Consider using floating frames to give each piece a unique presence on the wall, enhancing its impact. Opt for frames in neutral colors like black, white, or natural wood to ensure they complement any artwork you choose. Advanced decorators might explore using a rail hanging system, which allows for effortless swapping of art without damaging walls. This system is ideal for those who frequently update their collections or have an extensive array of artwork.
When selecting art, consider the color palette and theme of your room to ensure harmony. For a cohesive look, choose art that echoes the room’s existing colors or introduces a complementary accent. If you have a bold, colorful room, black-and-white artwork can provide a striking contrast. Conversely, in minimalist spaces, vibrant artwork can serve as a focal point that enlivens the setting.
To make the most of your rotating art collection, ensure that the lighting is adaptable and highlights the artwork effectively. Adjustable track lighting or picture lights can be excellent choices, allowing you to showcase different pieces as they’re rotated. Additionally, consider the height at which art is hung; aim for the center of each piece to be at eye level for optimal viewing. This thoughtful placement ensures that each artwork, whether new or familiar, receives the attention it deserves.
Experiment with Textured Wall Hangings
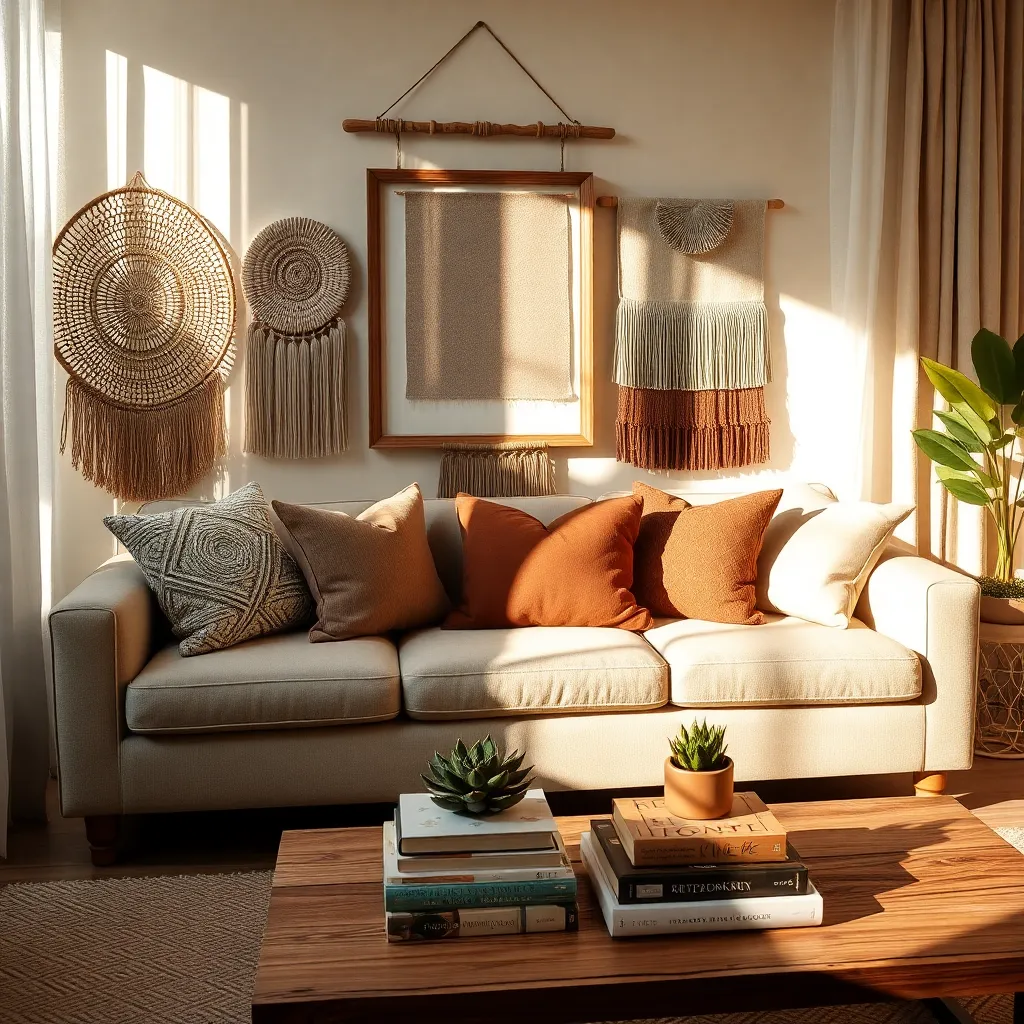
Exploring the world of textured wall hangings can transform a dull room into a dynamic masterpiece. Textiles like macramé, woven tapestries, or quilted pieces can add depth and warmth, making them perfect for creating a cozy atmosphere.
Begin by selecting a wall that could benefit from a visual uplift, such as the space above a sofa or bed. Consider the size and shape of the piece—it should complement your existing furniture layout without overwhelming the room.
Choose materials that resonate with the overall theme of your space. For a bohemian feel, opt for natural fibers in earthy tones, while metallic threads or sequins can enhance a more contemporary setting.
To ensure your textured wall hanging becomes a focal point, use contrasting colors. Pair a dark wall with a light-colored textile or vice versa, allowing the artwork to stand out and draw attention.
For advanced decorators, layering different textures can create a rich, multi-dimensional look. Hang a mix of flat and three-dimensional pieces at varying heights to add interest and intrigue to your wall.
Personalize with Family Photo Collages
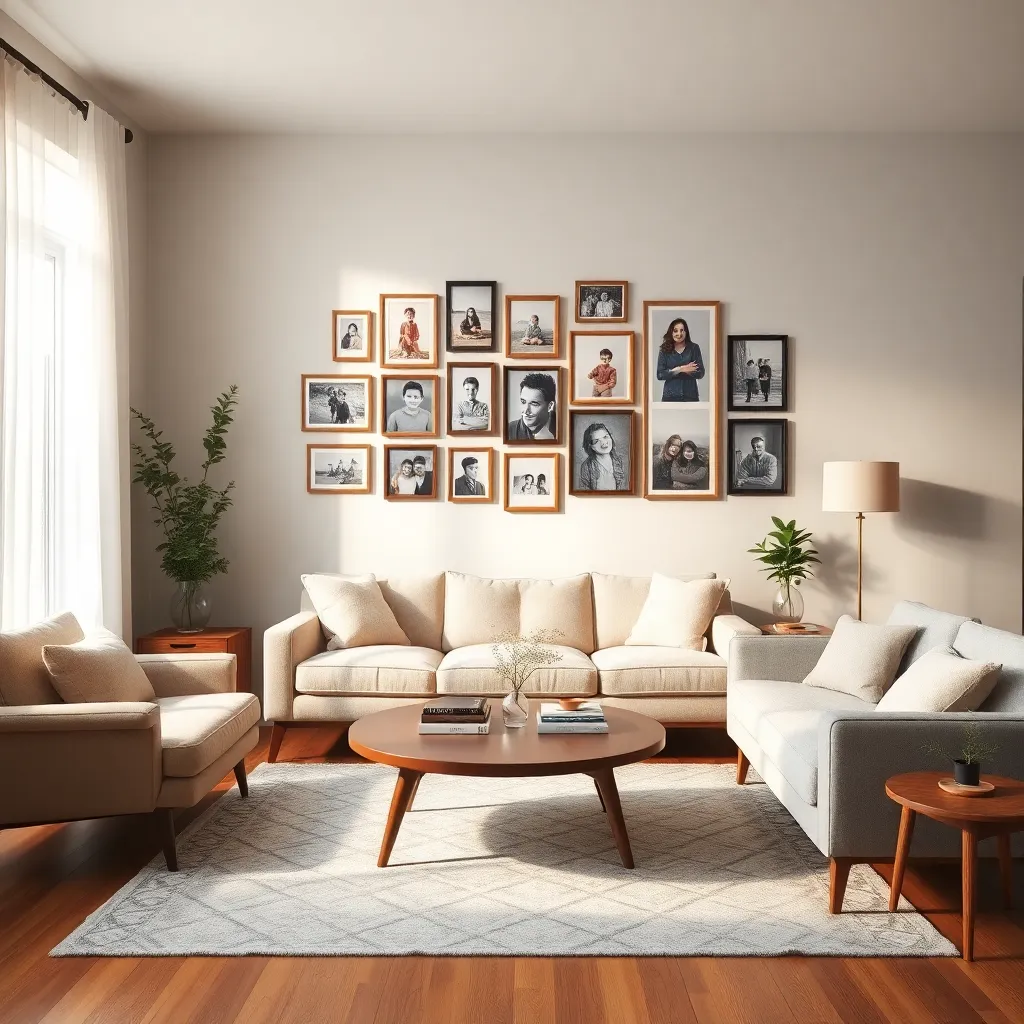
Creating a family photo collage is a wonderful way to personalize your space and make it feel uniquely yours. Begin by selecting a variety of photo sizes and orientations to add visual interest and a dynamic feel to your wall.
Choose frames that complement your existing decor to ensure a cohesive look. For a more eclectic style, mix frame materials such as wood, metal, and acrylic, but keep a consistent color palette to maintain harmony.
Arrange your photos on the floor first before committing to a layout on the wall. This allows you to experiment with different configurations, such as a grid pattern for a sophisticated look or a more freeform arrangement for a relaxed vibe.
When it comes to placement, consider hanging your collage at eye level to create a focal point in the room. For a more dramatic effect, extend the collage around corners or across two walls, drawing the eye and adding depth to your space.
Install DIY Painted Murals
Transforming a wall with a DIY painted mural can bring a unique character to any room in your home. Begin by selecting a theme or design that resonates with your personal style, such as a serene landscape for the bedroom or a vibrant abstract pattern for the living room.
To get started, sketch your design on paper and choose paint colors that complement your existing décor. Consider using a projector to outline the design on the wall, ensuring accuracy and ease, especially for beginners.
Once your outline is ready, use high-quality acrylic paints and various brush sizes to fill in the mural, starting with the larger areas and working towards smaller details. Opt for a matte or eggshell finish to avoid glare and ensure your mural blends seamlessly with the wall’s texture.
For advanced decorators, try incorporating texture with sponges or palette knives to add depth to your design. Layering colors can create an impressive 3D effect, making your mural a true focal point in the room.
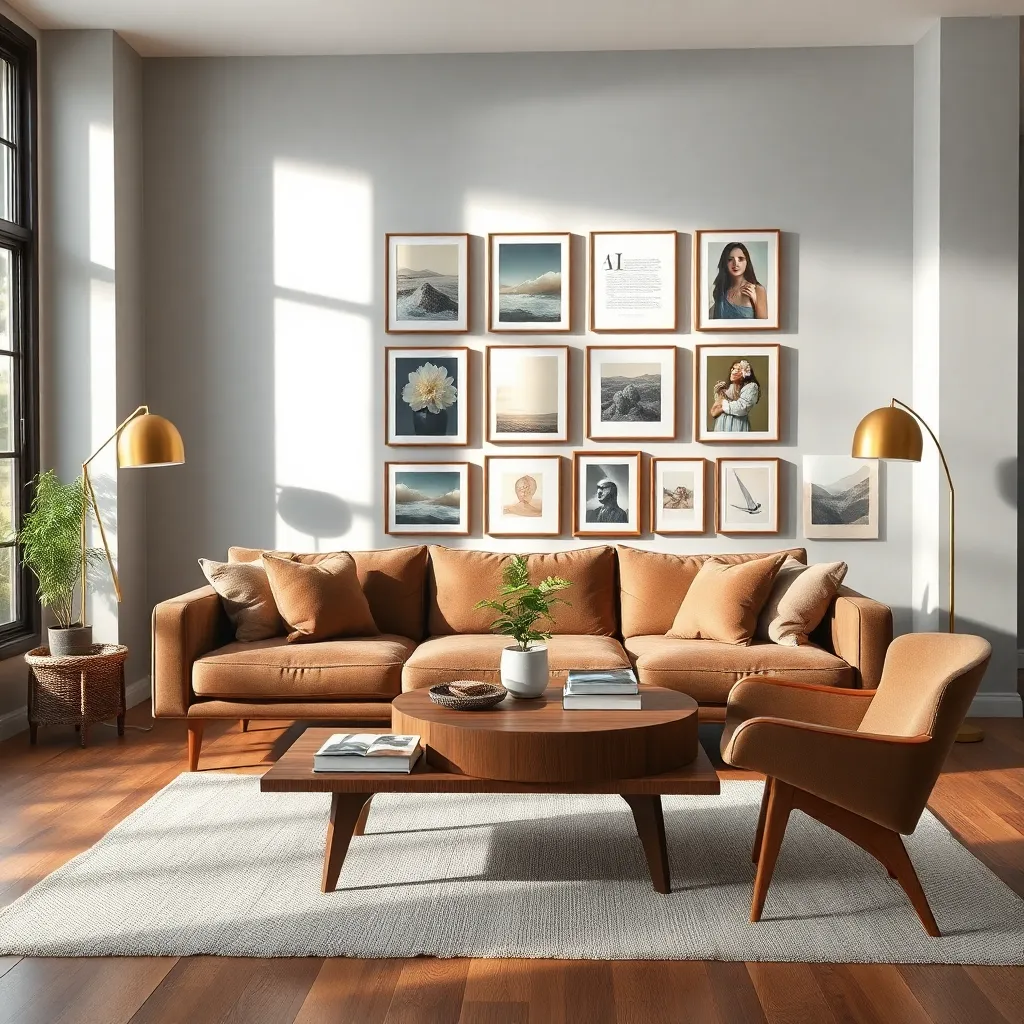
Layer Different Frame Sizes
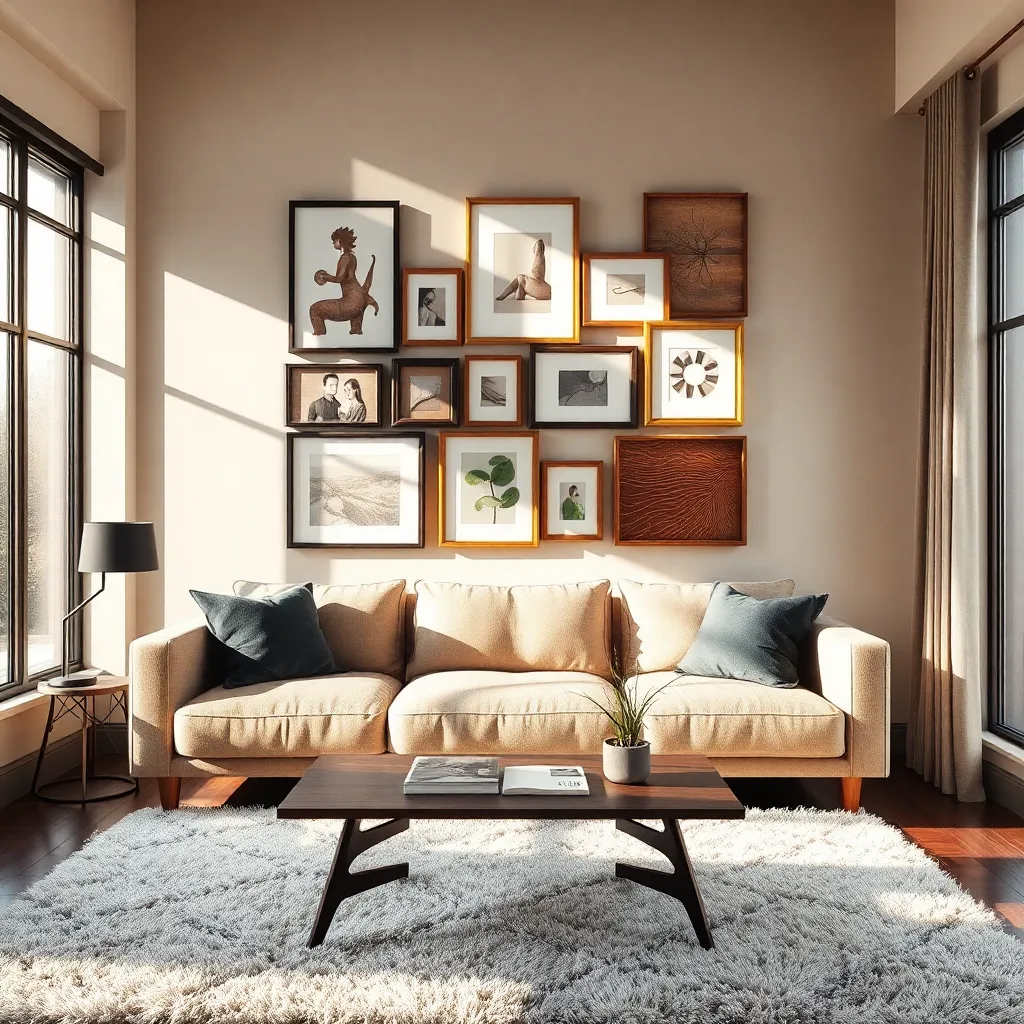
To create a dynamic and visually appealing wall display, consider layering different frame sizes. Start by selecting a mix of small, medium, and large frames to add depth and interest to your composition. This approach works beautifully above a sofa or along a hallway, where a gallery effect can be particularly striking.
Begin by laying out your frames on the floor to experiment with various arrangements before committing to hanging them. Try placing larger frames at the center or in the background, with smaller frames layered on top or around them for a well-balanced look. This technique allows you to showcase a variety of art styles and personal photos in a cohesive manner.
For a cohesive look, consider using frames in a similar color palette or material, such as wood or metal. Mixing black, white, and metallic frames can create a modern and sophisticated vibe, while a uniform material choice helps unify diverse art pieces. Opt for neutral tones if your walls are bold, or add a pop of color with the frames if your space is more subdued.
Advanced decorators might enjoy experimenting with different frame depths to add another layer of dimension. Consider incorporating shadow boxes or textured frames to elevate the visual interest even further. This approach not only highlights your favorite pieces but also adds an element of surprise and intrigue to any room.
Highlight with Strategic Lighting
Lighting can dramatically transform the impact of your wall art, creating focal points and enhancing colors. For beginners, consider using simple track lighting with adjustable heads that can be directed towards specific pieces, allowing your art to shine in any room.
To add dimension and intrigue, explore the use of LED strip lights behind large canvases or frames. This technique not only highlights the artwork but also casts a soft glow on the wall, creating an inviting ambiance.
For a more advanced approach, experiment with layering light sources to create depth and contrast. Use a combination of wall sconces and pendant lights to frame your art, ensuring the illumination is both functional and aesthetic.
Color temperature is crucial when highlighting art; opt for warm white lights to complement earthy tones and bring out the richness of the colors. Cooler lights can be used to highlight contemporary pieces, offering a crisp and modern feel.
Conclusion: Growing Success with These Plants
In exploring the vibrant world of wall art, we’ve uncovered ten creative concepts that parallel essential relationship dynamics: communication through personalized pieces, balance with symmetrical displays, adaptability in multipurpose art, growth through evolving galleries, harmony in mixed mediums, appreciation of unique styles, shared values in curated collections, spontaneity with temporary installations, reflection through mirrored art, and connection via collaborative projects. Each idea not only enhances your living space but also mirrors the nurturing elements crucial for a thriving relationship.
As a next step, choose one room in your home to transform with a piece of art that embodies a relationship value you cherish. This deliberate act of creativity can inspire meaningful conversations and deepen connections with your loved ones.
To ensure these insights remain at your fingertips, bookmark this article for future inspiration. Having these ideas readily available will empower you to continually infuse your home with art that reflects and strengthens your relationship.
Remember, just as art evolves, so do relationships. By actively engaging with the principles we’ve explored, you’ll be well on your way to cultivating a relationship that is not only visually beautiful but deeply fulfilling. Keep this guide handy, and watch your connection flourish.